Priv's Blog
Programming Simple Functionality: Unit 5 - User Interface) Lesson 5.4 - What’s the Difficulty? 본문
Programming Simple Functionality: Unit 5 - User Interface) Lesson 5.4 - What’s the Difficulty?
Priv 2021. 7. 24. 18:15출처
Lesson 5.4 - What’s the Difficulty? - Unity Learn
Overview: It’s time for the final lesson! To finish our game, we will add a Menu and Title Screen of sorts. You will create your own title, and style the text to make it look nice. You will create three new buttons that set the difficulty of the game. Th
learn.unity.com
1. 서언
(영상: 링크 참조)
Lesson 5.4 - What’s the Difficulty? - Unity Learn
Overview: It’s time for the final lesson! To finish our game, we will add a Menu and Title Screen of sorts. You will create your own title, and style the text to make it look nice. You will create three new buttons that set the difficulty of the game. Th
learn.unity.com
2. 게임 제목 텍스트와 메뉴 버튼 생성하기
여러분이 먼저 해야 할 일은 필요한 UI 요소들을 만드는 것입니다. 필요한 UI 요소에는 커다란 게임 제목과 3가지 종류의 난이도 버튼이 포함됩니다.
(영상: 링크 참조)
Lesson 5.4 - What’s the Difficulty? - Unity Learn
Overview: It’s time for the final lesson! To finish our game, we will add a Menu and Title Screen of sorts. You will create your own title, and style the text to make it look nice. You will create three new buttons that set the difficulty of the game. Th
learn.unity.com
1. 게임 오버 텍스트 오브젝트를 복사해 타이틀 텍스트 오브젝트를 생성하신 뒤, 제목, 텍스트 및 모든 구성 요소들을 편집해주세요.
2. 다시 시작 버튼을 복사하신 뒤 구성 요소들을 편집해 "쉬움 버튼"을 만들어주세요.
3. 새로 만드신 쉬움 버튼을 복사 및 편집하셔서 "보통 버튼"과 "어려움 버튼"을 만들어주세요.
3. DifficultyButton 스크립트 추가하기
여러분의 난이도 버튼은 보기에 좋아 보이지만, 실제로 아무런 기능도 하지 않고 있습니다. 각각의 버튼들이 동작하도록 만들려면, 먼저 새로운 스크립트를 할당해주어야 합니다.
(영상: 링크 참조)
Lesson 5.4 - What’s the Difficulty? - Unity Learn
Overview: It’s time for the final lesson! To finish our game, we will add a Menu and Title Screen of sorts. You will create your own title, and style the text to make it look nice. You will create three new buttons that set the difficulty of the game. Th
learn.unity.com
1. 새로 만드신 버튼 3개의 컴포넌트 안에 있는 On Click() 항목에서 빼기(-) 버튼을 클릭해 RestartGame 기능을 제거해주세요.
2. DifficultyButton.cs 스크립트 파일을 새로 만드시고 버튼 3개에 모두 할당시켜주세요.
3. using UnityEngine.UI를 상단에 추가해주세요.
4. private Button button; 변수를 새로 생성하시고, Start() 안에서 초기화해주세요.

4. 버튼을 클릭했을 때 SetDifficulty를 호출하도록 만들기
이제 여러분의 버튼에 스크립트를 할당했으므로, SetDifficulty 메서드 제작하고 이를 버튼 클릭과 연결시킬 수 있습니다.
(영상: 링크 참조)
Lesson 5.4 - What’s the Difficulty? - Unity Learn
Overview: It’s time for the final lesson! To finish our game, we will add a Menu and Title Screen of sorts. You will create your own title, and style the text to make it look nice. You will create three new buttons that set the difficulty of the game. Th
learn.unity.com
1. void SetDifficulty 함수를 새로 만드시고, 안에 Debug.Log(gameObject.name + "was clicked");를 추가해주세요.
2. 버튼 리스너(Button listener)를 추가하여 SetDifficulty 함수를 호출하도록 만들어주세요.

5. 버튼으로 게임이 시작되도록 만들기
주변에서 튀어 오르는 타깃 오브젝트들만 무시한다면 타이틀 스크린이 멋져 보이지만, 여러분이 게임을 시작할 수 있는 방법이 전혀 없습니다. 이 문제를 해결하기 위해서는 SetDifficulty와 상호작용 할 수 있는 StartGame 함수가 필요합니다.
(영상: 링크 참조)
Lesson 5.4 - What’s the Difficulty? - Unity Learn
Overview: It’s time for the final lesson! To finish our game, we will add a Menu and Title Screen of sorts. You will create your own title, and style the text to make it look nice. You will create three new buttons that set the difficulty of the game. Th
learn.unity.com
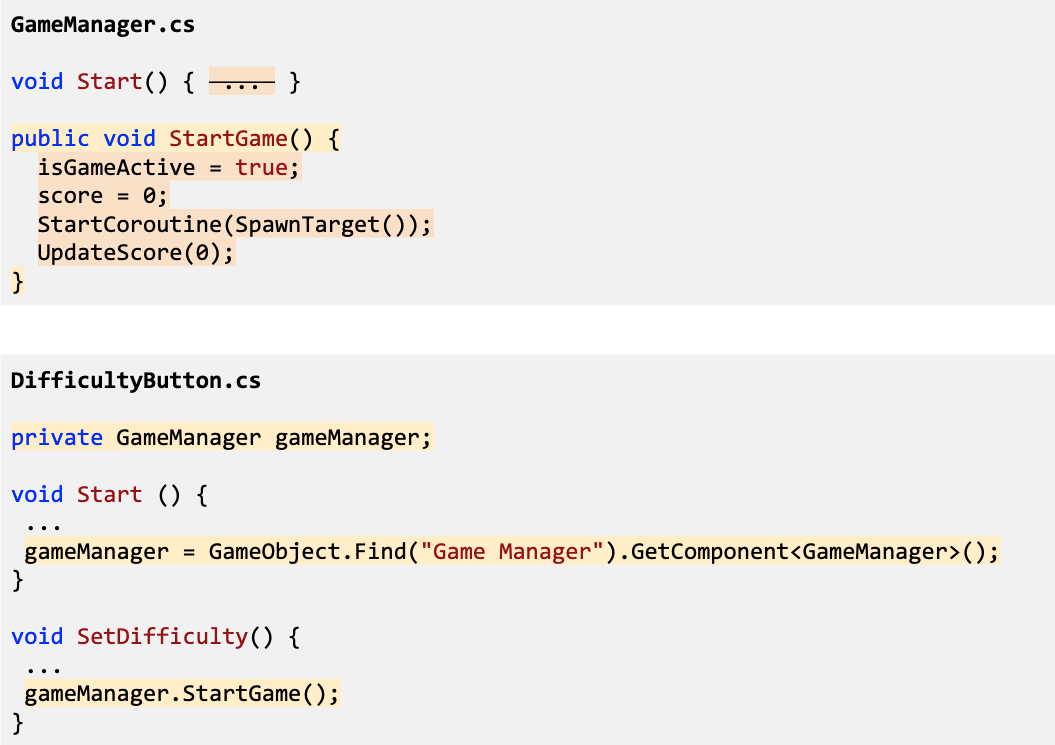
1. GameManager.cs 안에 public void StartGame() 함수를 새로 생성하시고 Start() 안에 있는 코드들을 모두 옮겨주세요.
2. DifficultyButton.cs 안에 private GameManager gameManager;를 새로 생성하시고 Start() 안에서 초기화해주세요.
3. SetDifficulty() 함수 안에서 gameManager.StartGame();을 호출해주세요.

6. StartGame에서 타이틀 스크린 비활성화하기
만약 여러분이 게임이 시작되었을 때 타이틀 스크린이 비활성화되도록 만들고 싶으시다면, 개별적으로 오브젝트들을 비활성화하는 것 대신, 빈 오브젝트(empty object)에 넣어 주는 것이 좋습니다. 간단하게 부모 오브젝트 하나만 비활성화하도록 만들어주면 수고가 훨씬 줄어듭니다.
(영상: 링크 참조)
Lesson 5.4 - What’s the Difficulty? - Unity Learn
Overview: It’s time for the final lesson! To finish our game, we will add a Menu and Title Screen of sorts. You will create your own title, and style the text to make it look nice. You will create three new buttons that set the difficulty of the game. Th
learn.unity.com
1. Canvas에서 마우스 우클릭 후, Create > Empty Object 클릭, 이름을 "Title Screen"으로 바꾸신 뒤, 3개의 버튼과 타이틀 오브젝트를 드래그해서 자식 오브젝트로 만들어주세요.
2. GameManager.cs 안에 public GameObject titleScreen;을 새로 만드시고, Inspector에서 값을 할당해주세요.
3. StartGame() 안에서 타이틀 스크린(title screen) 오브젝트를 비활성화해주세요.

7. 난이도 변경을 위해 매개변수 사용하기
난이도 버튼을 통해 게임이 시작되지만, 아직 게임의 난이도가 변경되지는 않습니다. 마지막으로 여러분이 해야 할 일은 난이도 버튼이 타깃 오브젝트들이 생성되는 간격을 바꿀 수 있도록 만드는 것입니다.
(영상: 링크 참조)
Lesson 5.4 - What’s the Difficulty? - Unity Learn
Overview: It’s time for the final lesson! To finish our game, we will add a Menu and Title Screen of sorts. You will create your own title, and style the text to make it look nice. You will create three new buttons that set the difficulty of the game. Th
learn.unity.com
1. DifficultyButton.cs 안에서 public int difficulty 변수를 새로 만드시고, Inspector에서 쉬움 난이도는 1, 보통 난이도는 2, 어려움 난이도는 3을 할당해주세요.
2. int difficulty 매개변수를 StartGame() 함수에 추가해주세요.
3. StartGame() 안에 spawnRate /= difficulty; 를 추가해주세요.
4. 난이도 매개변수를 StartGame(difficulty)로 전달하여 DifficultyButton.cs에서 발생하는 에러를 수정해주세요.

8. 내용 복습
(영상: 링크 참조)
Lesson 5.4 - What’s the Difficulty? - Unity Learn
Overview: It’s time for the final lesson! To finish our game, we will add a Menu and Title Screen of sorts. You will create your own title, and style the text to make it look nice. You will create three new buttons that set the difficulty of the game. Th
learn.unity.com
새로 배운 기능들
- 게이머가 직접 게임을 시작하도록 만드는 타이틀 스크린 제작하기
- 오브젝트 생성 간격을 조정하는 난이도 선택 기능 제작하기
새로 배운 개념과 기술들
- AddListener()
- 스크립트 파일들 간에 매개변수 전달하기
- 나누기/할당 (/=) 연산자
- 자식 오브젝트들 그룹화하기


